Pages

Thursday, May 17, 2012

How to take ownership of a file or folder (either system or not) in windows

This is an update to the previous post "How to add a local user to take ownership of a file"
In the above process due to some reason some errors occured like we are unable to save the file or some error message comes like "Destination to folder access is denied" or "Folder location is not available" or "Access is denied".


So here is the modified process to take ownership of a file.


Process to take ownership of a file in windows:
1. Select the file or folder whose ownership you want to take and right click of mouse on it and choose "Properties".
2. On the property window navigate to "Security" tab.
3. Click on "Advanced".
4. On the open advanced security option window navigate to "Owner" tab.
5. Now click on "Edit".
6. a new window for advanced security option will be opened.
7. you will find a table asking for "Change owner to". Now select the local user to which you want to take the ownership.
8. Below that you will find an check box "replace owner on sub containers and objects".
9. Just tick the check box.

[Screen shot for the Process from steps 2 to 9]


10. Now apply all the modified setting.
11. During apply the changes it will show an message "You dont have the permission to read the file or the contents of the directory. Do you want to change the permission of the file or folder to full control. All permission will be replaced if you press ok".
12. Just ignore the message and Press ok.

That is it.Now the ownership of the file will be changed and the logged user will be able to access the file or folder.

How to create an invisible folder in windows seven, Vista and XP | How to create a hidden folder without any name and with a blank icon in Windows


This process will make a folder invisible. So that no one will be able to see that folder. But in thumbnail view of folder the location of the folder is viewable.
 Process to make a folder Invisible
1. First create a folder or make a folder with a blank space or without any name. To do so, create a folder with a blank space or without any name.
2. Now a folder without any name will be created.
3. Now you have to change the icon of the folder so that the folder will be invisible.
4. Now righ click on the folder and choose "Properties".
5. On the propeety window navigate to "customize" tab.
6. Now click on "Change Icon".
7. Now the icon selection window will be opened.
8. Now move the scroller and choose the empty icon as shown in the figure.
[Figure for step 2 to 8]

9. Now click on Ok and apply all the changes.
10. Now you will find that the folder that you have created is invisible.
11. To view that folder change the view setting of the folder to "thumbnail" and arrange the folder by types.
12. You will be able to see the location of the folder. Just open that folder and  you will be able to do any type of operation like copy, move, paste etc.. on that folder.
 Here the contents of the folder are not unsearchable.

Wednesday, May 16, 2012

How to access/open or bypass a blocked website in School and College | How to unblock a website at school, college and Office | How to unblock restricted website or access Blocked Websites which are protected by someone or itself

We found that most of the Organisations, School and Colleges blocked some special type of websites on there server. So that no one will be able to open that website. Those blocked websites are mainly the social networking sites, Public Mail sites, Various Download sites, Pornographic sites.
They blocked these sites because people or student spend a lot of time on these websites and make delay on there work without any purpose.


Main reasons of not opening a website 
 
A)the website may itself blocking you
B) The website may be blocked by some one or by the institution
        So here is the process to open blocked websites which are blocked by the above


A) Unblock the Websites which are restricted itself to visit them
 
Many websites occasionally blocked some IPs due to various reason like spamming, huge use etc.. And show you an Error Message that "Your IP has banned" or "Bad IP". In that case just contact your Internet Provider or Broadband Provider to change your IP.
after your Ip has changed you can use those websites on a regular  basic.

B) Unblock the websites which are blocked by someone or by the institution
 
Almost all the educational institution blocked some websites (like social networking, Pornographic content,download music and movies etc..) on there server.
You can open those websites in very simple process.
There are various websites which uses different proxy to gain you access those websites anonymously.
Just Open these Websites
www.hidemyass.com or kproxy.com or flyproxy.com . You will find a search box on the website. Just write the url of the blocked website which you want to open. That is it.

Shortcut keys to create a New Folder in Windows Seven Explorer | Hot keys or Keyboard shortcuts for creation of New Folder in w7 explorer window


Here I will describe you how to create a new folderusing your keyboard. This will helps in creating a folder using windows keyboard keys.
Process:
Just open the window where you want to create a new folder. Now simultaneously press "ctrl+shift+N". A New folder will be instantly created and ready to be named.In this process you can also create a folder on your desktop.

How to know which finger is use to type which key in keyboard | How to type correctly | How to use all your fingers in right place in keyboard to become a fast typist | How to type without watching the keyboard

Tips:
1.  Use all of your fingers.
2.  You need to know where to place your finger.
3.  Never see the keyboard while typing. Just remember what finger will type it.
4.  More practices.

The below picture shows where to place your finger in the keyboard


Here are the keys that should be press by your finger
Left Hand:
Index finger = 4 R F V 5 T G B
Middle finger = 3 E D C
Ring finger = 2 W S X
Little finger = 1 Q A Z ` Tab “Caps Lock” “Left Shift” “Left Ctrl”

Right Hand:
Index finger = 6 Y H N 7 U J M
Middle finger = 8 I K ,
Ring finger = 9 O L .
Little finger = – [ ] µ / \ = Backspace Enter “Right Shift” “Right Ctrl”

Before start typing, place your fingers in the right place. Notice button F and J in your keyboard. There is a kern below the letter. That is the place where your index finger should be. Put your left index finger in F, and your right index finger in J. The rest of your fingers
should be:
Left middle finger = D and the right middle finger = K
Left ring finger = S and the right ring finger = L
Left little finger = A and the right little finger = ;

Ctrl – Alt – Shift
To combine keys ctrl, alt or shift with another key, you should notice where is the key, in the left hand side, or right hand side. For example, to combine Ctrl + L, you should know where is the position of the L key. From the picture above, we know that L is in the right side. So you must press left Ctrl using your left little finger and press L using right ring finger.

The best typing practice software is Typing Master. Download the software from here.
Typing Master Pro Full version with serial key Download 
First practie by watching the keyboard keys. Then try to remember all the keys where they are palaced. Then practice without watching the keyboard.
First you will feel that your typing speed is very slow then prctice will increase your typing speed.

How To Hard Reset or Format a Nokia E Series Mobile code without using Any 3rd party Software

When We need To reset the Phone:

  • When the phone does not work how it works before without any hard ware damages.
  • Menu Get Stuck.
  • Application doesn't work properly
  • Mobile get hangs when playing Music Player.
  • Some application doesn't open and show error.
There are two types Of reset.
  • Soft reset
  • Hard Reset
Soft Reset Of Nokia E series Mobile (Tested on Nokia E71)
Note: Soft reset will not delete any user data like contacts, sms, any files from your mobile. It will only reset the mobile and come to default restore factory setting.
steps:
  1. Switch on your mobile on stand by mode.
  2. Type *#7780#
  3. It will ask for a password enter 12345
  4. After some time phone will be restarted
  5. That is done
Hard Reset Of Nokia E series Mobile (Tested on Nokia E71)
Note: Hard rest will delete all the users data from the phone. So before making the Hard reset make a back up of your data. It is better than the soft reset to solving the mobile problems.
steps:
  1.  Switch on your mobile on stand by mode.
  2.  type *#7370#
  3.  it will ask for a password enter 12345
  4.  After some time phone will be restarted
  5.  that is done

How to make windows Seven Genuine or Activate the unregistered version without serial key free

Some of the Common Error message regarding Windows Activation In Windows Seven Ultimate, Home Basic, Home Premium, Starter, Business
  1. Your Copy of Windows is Not genuine.
  2. Your copy of windows is not Activated. Activate it Now.
  3. Your Activation Period Has Expired. Click this Message to start Activation.
  4. The copy Of windows Did not pass Genuine Validation. You might be a victim of software counter Felting.
To overcome these errors mnd make our installed Operating Systems Registerd- Full version and Genuine We need a 3rd Party Software named as RWAT.
This will make our Windows Seven Genuine So that it will pass Genuine Activation technology By Microsoft.
RWAT free download with detail description of its Features
Download the Software from the above download link and install it on your system and read the detail description of Rwat  and how to use it there. and Make it Full version.

How to create a con folder without using Command prompt (cmd)

This is the very simple trick and just a combination of my two previous article.
How to create a folder with any name and
How to create a folder with no name or with a blank space

In the same Process we can also create a folder with the following names. To do so just change CON with these folder names in step-3
  • Prn
  • Nul
  • Lpt1
  • Lpt2
  • Lpt3
  • Lpt4
  • Lpt5
  • Lpt6
  • Lpt7
  • Lpt8
  • Lpt9
  • Com1
  • Com2
  • Com3
  • Com4
  • Com5
  • Com6
  • Com7
  • Com8
  • Com9
These are the reserved name of by windows So we can not create a folder with these names by simple folder creation method.

Process to create a con folder without using command Prompt

1. Create a folder or rename a folder.
2. Now press "Alt" and type 255 (using numpad that are present at the right side of keyboard).
3. Then type CON and press Enter.
4. Now a folder with the name CON will be created.
5. Theis folder can be easily deleted.
But in my Previous post
How to create a con folder or Create a folder with any name
The created CON folder can not be easily deleted.

How to customize or change the Power button Action in Windows 7 Start menu to shutdown, Switch User, Log off, Lock, Restart, Sleep or hybernate

We can change the Power button Action according to our requirement in Windows Seven Start menu As
  • Shut Down
  • Switch User
  • Log Off
  • Lock
  • Restart
  • Sleep
  • Hybernate

Process to change Power buton Action:
1. Right Click of mouse on an empy space of taskbar and Choose "properties"
2. On the "taskbar and start menu properties" window , Navigate to "Start Menu" tab.
3. On the "Power button Action" Choose the desired action from the drop down list.
4. Now "apply" the changes and click on "ok".
5. Now click on start button and see the changes.

How to change or rename a drive from "Local Disk" to any other desired name in Windows Xp, Vista and Seven

The process will describe how we can rename a windows Drive. By default the default name of the Windows Drive is "Local Disk" with the drive path. In the past I have described 
How to change the drive letter or Paths in Windows Xp, Vista and Seven 
 
Process: 
1. Open "My Computer"
2. Select the drive whose name you want to change.
3. Right click of Mouse on it and choose "Rename"
4. It will ask to enter a name for the drive as shaded place.
5. Enter a name and hit "Enter".
6. it will show an error that "Access is Denied". "You will need to provide Administrator permission to rename this drive".
7. Just Ignore the message and click on "Continue". If it further ask for password then enter the Administartor password and click on continue.
8. Now apply all the changes. That is it. After reboot you will find the changed name of your drive. 

How to show or hide the Drive letter in windows XP, Vista, Seven

The process will describe how we can hide or show the Drive letter of MY COMPUTER.
Process:

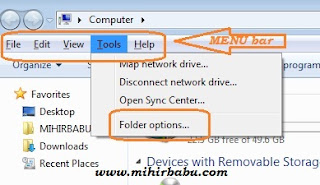
1. Click on "Tools" on the Menubar of Explorer Window (i.e. on My Computer)
 
2. Now click On "Folder Option"

3.On the Folder Option Window Navigate to "View" tab.
4. On the "Advanced Setting" box Scroll down the scroller.
5. You will find an option "Show Drive letter"
(By default it is on checked condition)
6. Uncheck it if you want to hide the drive letter or Leave it as checked condition to show the drive letter.
7. Now click on "OK". That is it.

How to open Registry Editor and Group policy Editor in Windows XP, Vista and Seven

To open registry Editor and Group policy editor follow the below process
For Windows Xp users:
Click on "Start" and then Click on "RUN" button.
Type the below commands to open Registry Editor and Group policy Editor

Registry Editor: regedit.exe
Group policy Editor: gpedit.msc

For Windows Vista and Seven Users:
Click on Start button and type the below commands on the start search box

Registry Editor: regedit.exe
Group policy Editor: gpedit.msc

How to install or Add a registry file in Windows XP, Vista and Seven

1. Open registry Editor.

2. Now click on File on "Menubar"

3. Now Click on "Import".


4. It will open the "Browse" window.
5. Now choose the registry file that you want to install and click on open.
6. it will show an message that the registry Entry is successfully added to the registry.That is it.

You can also install a registry file by double click on that file (or right click of mouse on that file and choose merge)
it will open UAC prompt and show you that the adding registry file must be harmful to your system.


Just ignore all the message and click on OK. After that it will show the message that the registry entry is successfully added to the registry.That is it.

How to make the back up/Export/save a registry Entry in Windows Xp, Vista and Seven

1. Click on "file" on Menu bar.

2.Now click on "Export"


3. it will open the browse window.
4. Now open the desired location where you want to save the registry file and give a name to that registry.
5. that is it. Now open that location you will find a back up of your registry. (i.e. the file with .reg extension)

1. open Registry Editor.
2. Navigate to the key that you want to save or create a back up for that.
3. Now Right click on that key.
4. Now click on Export.


5. Now open the desired location where you want to save the registry file and give a name to that registry.
6. That is it. Now open that location you will find a back up of your registry. (i.e. the file with .reg extension)

How to take permission (ownership) of a registry key or Entry in Windows XP, Vista and Seven

How to take permission (ownership) of a registry key or Entry in Windows XP, Vista and Seven


Process:
1. Open registry Editor

Check: How to open Registry Editor
2. Select the key whose permission or ownership you want to take.
3. Right Click on that key and choose " permission".


4. Now the Permission Window will open. Now click on "Advanced"
                                        
5. Now the Advanced Security Setting for the registry key is opened.
6. Navigate to "owner" tab.
                                  

On the " Current owner" you will find the current owner of that file.
On the "Change owner to" option you will find the list of all the users on the computer. There choose your logged user or the user who want to take permission of that key and Click on "apply"
Now you will find your changed user on the "Current owner " option.

7. checked the option "Replace owner on sub containers and Objects". So that for all the sub keys under that key has the same owner.
8. Now navigate to "permission" tab in Advanced security setting of the key.

9. Checked the two option
  • Include Inheritable permissions for the object parent.
  • Replace all inheritable permissions on all descendants with inheritable permission from this object.

9. In the "Permission Entries" option choose your logged user whose permission you want to modify and Click on "Edit"
10. On the open Window choose which type of permission you want to take. You can manually choose one one option otherwise choose full control option so that you can able to modify read write on that key.
Now apply all the changes and Click on "OK". Close all the open Windows by clicking on "OK".
That is it.